
If you have a good tip of your own, please use the contact form on the suggestions page, and we may add it to this list.
Some basics about the causes of shake in a video and how the ZeroShake iPhone or iPad app can prevent this
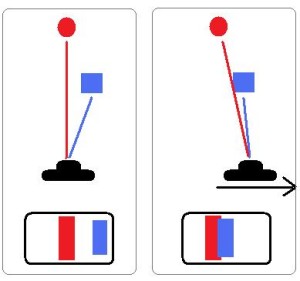
Lateral movements
There are two kinds of motions that cause shake in a video. The first is lateral (or sideways) motion. This is only visible with objects that are close to the camera. We also cannot compensate for these kind of motions, because the vantage point of the camera changes. So objects at different distances do not line up the same in a frame. Just move you body sideways, while looking at something, to see the effect.
Angular movements
The second type of motion is angular or rotational motion. Imagine looking left and right or up and down. The objects in the frame stay aligned, as the vantage point of your eye (or the camera) does not change. When you look at something and move your head around in a rotational way, your eyes move to counteract that, and the image appears to be still. This type of motion is also far more obvious as shake in a video, if not stabilized. But fortunately we can compensate for it with ZeroShake, similar as your eyes compensate for your head movements.
Explanation of the ZeroShake recording interface
There are many kinds of image stabilization systems for video on the market. The problem they all have is that they cannot know if your movement is due to an undesired shake or part of a (small) panning motion. That is where ZeroShake is unique and different. It shows the orientation and rotational movements of your device on the screen.
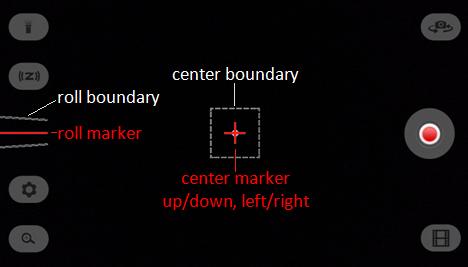 There is a red cross marker in the center of the screen showing left/right and up/down motion, and another line marker at the side of the screen showing roll. These markers move as you move the device around. Point the camera upwards for example and the center marker will move up. As long as you keep the markers from touching the boundaries, it will fully compensate for that motion. If you move more, than you tell the ZeroShake stabilization system that your movement is not an accidental shake but you intend to make that panning movement. So the stabilization for that direction stops, until you stop panning and your marker stops touching the boundary. At this point your undesired shake will be fully compensated for again. The feedback the markers are giving you may take a bit getting used to, but after some practice you will be able to make videos as if you were using a tripod. You can set the size of the boundary (and thus its sensitivity) via the ZeroShake settings menu.
Having problems with sudden shifts on the screen or ZeroShake markers reacting weird
Sometimes it happens that the image suddenly shifts to the side. This happens due to the very complex motion detection process we are running. To be able to show you the shake markers accurately, we collect data from several sensors in your device, and fuse them together. Sometimes there is an error which causes this quick shift in the image to happen. What helps is to slowly rotate the device in all directions to give the system a chance to adapt.
 Also of influence on the sensors is the temperature. Just after starting the ZeroShake application, the temperature in and around the sensors is rising, and it takes the system a little time to adjust to that. Just wait a couple of seconds, and it should get better. Turning the torch on increases the temperature around the sensors more rapidly, so after doing that, also give the system a little time to adjust.
Lastly, it is important to keep a little distance from magnetic things, like your computer or another telephone while filming. One of the sensors we use is the magnetometer, and having a magnetic object nearby corrupts its readings, resulting in sudden shifts on the screen.
Panning
In order for ZeroShake to know when and by how much it should stabilize the frames you record, it keeps contact track of the orientation of your device. If you make a rapid panning movement, the motion filter that obtains the orientation may not be fast enough to keep up. This will be visible on the screen or in the recording by weird looking or shocking effects. For that reason it is important not to make very fast pans when the stabilization is turned on.
When you make a panning movement in one direction, the stabilization for the other two directions is still following the ZeroShake stabilization system. So for a nice level right panning for instance, you should try to prevent the center marker from touching the top or bottom of the boundary, and prevent the roll marker from touching the boundaries as well. That way any undesired up, down and roll shake will be perfectly stabilized, during your intended right panning movement.
Best settings for stabilization and focus
![]() You can select the amount of stabilization and how the auto-focus behaves via the ZeroShake settings.
You can select the amount of stabilization and how the auto-focus behaves via the ZeroShake settings.
For activities which result in little shaking of your device, you should choose the small stabilization setting. That way less cropping occurs, so you keep almost the full field of view and best image quality.
If during a more shake prone activity, like walking, it becomes very hard to keep the shake markers from hitting the boundaries, then you should set the stabilization to large. With some practice it becomes easier and easier to get very still videos. Try it will driving, cycling, boating, etc!
 ZeroShake offers three focus settings. If you set it to manual, the focus will be locked, and only refocuses when you tap the screen, on the object you’d like to focus on.
Set it to auto to have auto-focus, like you are used to with any other camera.
The third option is unique for the ZeroShake app. When ZeroShake focus is activated, the focus is locked, as long as you keep the center shake marker from touching the boundaries. Auto-focus within the ZeroShake focus setting is only activated during deliberate panning motions. After you stop panning, the focus gets locked again. At any time you can still tap the screen on the area you want to focus on manually.
Best general settings
![]() Via the general settings menu you can choose which resolution to record in.
Via the general settings menu you can choose which resolution to record in.
For the iPhone 4S and some older iPads the highest resolution possible for the back camera is HD, 720p. With the newer iPhone and iPad models you can record in up to Full HD, 1080p with the back camera. The higher you set the resolution, the better the quality of the video is. But processing higher resolution frames takes longer and asks much more in respect to stabilization. You may notice that videos are better stabilized when choosing the lower 480p resolution. Any recording that is shared via email or Facebook will be re-sized to the lower quality before processing, for faster uploading and processing of effects. Only set to ‘720p’ or ‘1080p’, if you plan to send your recorded video to the device’s Camera Roll.
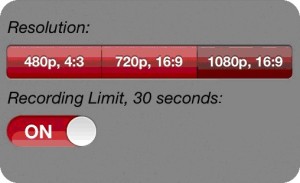 The free version of ZeroShake is limited to 30 seconds of recording. For your creative, fun or exciting videos, which you want to share online, this is long enough. However, if you like to record longer for other purposes, then you can deactivate the limit through a small in-app purchase.
Recording in in low light conditions
When you are filming in low-light conditions, it takes the image sensor longer to capture a frame, in order to have a bright enough video. It is similar to photography where the exposure time is longer when there is less light. In photography sometimes images become blurry when you don’t keep the camera still enough when using a long exposure time. A video is nothing more than many quick frames recorded after one another. So even though ZeroShake can perfectly stabilize the position of the frames in relation to a desired reference point, it can’t remove the motion blur from within the individual frames. This becomes apparent when you have lighter and darker objects in one frame together. The lighter objects seem to be stretching out during quick shakes. The best way to deal with this if you cannot increase the amount of light, is to record in a lower resolution. At the 480p setting, the image sensor uses a larger area for each individual pixel, and thus exposure time is less than when filming in a higher resolution. The overall video will show far less motion blur, and the video as whole is a lot less dark as well.